
How to Clean Leather Couch Like a Pro
Your high-quality leather furniture is a significant investment, built to gain character and beauty over time. However, professional restorers agree that without consistent, correct maintenance, the natural oils deplete, accelerating dryness, fading, and irreversible cracking.
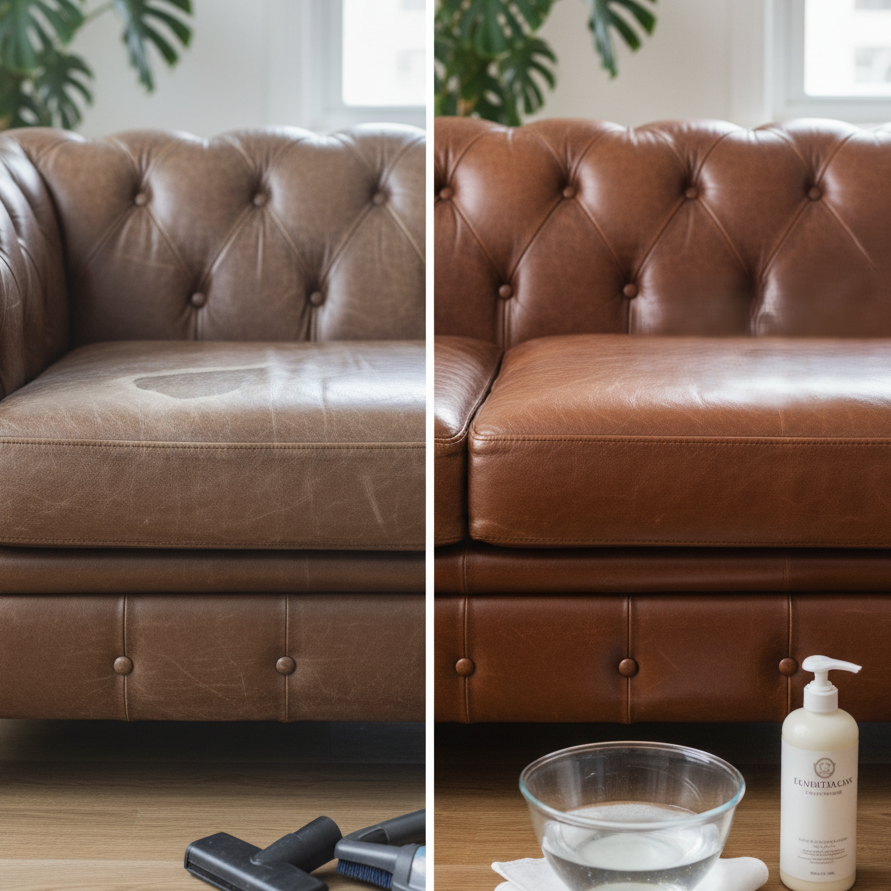
If you demand proven, reliable methods, this is the resource you need. Are you searching for detailed instructions on how to clean a leather couch effectively? This definitive guide, compiled with expert insights, breaks down exactly how to clean leather furniture (including sofas, chairs, and ottomans), treat the most difficult stains, and apply proper conditioning. Follow these steps to reliably keep your leather soft, supple, and looking luxurious for decades.
1. Essential Steps for Cleaning Your Leather Furniture (Knowing Your Leather and Tools)
Before you begin, understand that not all leather is the same. Most sofas are made from finished (or protected) leather, which has a protective topcoat and is easiest to clean. Unfinished leather (like aniline or nubuck) is highly absorbent and requires specialized cleaning—if you have unfinished leather, professional cleaning is highly recommended.
The Golden Rule: Always Test First!
Regardless of your leather type, always test your cleaning solution and conditioner on an inconspicuous area (like the back of the sofa skirt or the underside of a cushion). Wait 5-10 minutes to ensure there is no discoloration, fading, or adverse reaction before proceeding.
Essential Supplies Checklist
-
Microfiber Cloths: You’ll need several; they are soft and won't scratch the leather.
-
Soft-Bristle Brush/Upholstery Vacuum Attachment: For routine dusting and debris removal.
-
Mild Liquid Dish Soap: Use a natural, pH-neutral formula.
-
Distilled Water: Tap water can leave mineral deposits on the leather surface.
-
Leather Conditioner: A commercial product or a natural homemade mixture.
-
Optional for Stains: Rubbing alcohol, cornstarch/baking soda.
2. How to Clean a Leather Couch at Home: Step-by-Step Routine Cleaning
Regular maintenance prevents dirt from becoming ingrained and damaging the leather’s finish. Aim for a quick dusting weekly, and a deep clean twice a year.
Phase I: Removal of Dry Debris (Weekly)
-
Vacuum the Surface: Use the soft brush attachment on your vacuum cleaner to gently remove dust, lint, pet hair, and crumbs from the entire surface. Pay special attention to seams, folds, and under the cushions where debris accumulates.
-
Gentle Wiping: Follow up with a dry, clean microfiber cloth to gently wipe down all surfaces. This prevents fine abrasive particles from grinding into the leather during the wet cleaning phase.
Phase II: The Deep Clean (Biannually)
This step removes body oils, spills, and grime that have built up over time.
-
Prepare the Solution: Mix a few drops of mild dish soap into a bucket or bowl of distilled warm water. The solution should be slightly sudsy, but not overly concentrated.
-
Alternative Solution: A mixture of equal parts white vinegar and distilled water is also effective for deep cleaning, especially on stubborn spots.
-
-
Dampen the Cloth: Dip a clean microfiber cloth into the solution. Wring it out until it is barely damp. Excess water is the enemy of leather and can lead to discoloration or swelling.
-
Clean Section by Section: Starting from the top of the furniture and working your way down, gently wipe the leather in a circular motion. Focus on areas that see the most contact, like armrests and headrests. Rinse your cloth frequently and refresh the cleaning solution if the water becomes too murky.
-
Rinse (Important): Use a second, clean cloth, dampened only with distilled water, to wipe the surface again. This removes any soap residue that could dry out the leather.
-
Pat Dry: Immediately wipe the entire area with a final, clean, dry towel. Never allow the leather to air-dry while still wet from the cleaning process.
3. Stain Removal Hacks
Tackling spills immediately is crucial. Always blot fresh spills gently with a dry towel—do not rub!
| Stain Type | Targeted Cleaning Method |
| Grease, Oil, or Butter | Action: Wipe away any excess oil immediately. Sprinkle the spot heavily with baking soda or cornstarch. These powders are highly absorbent. Wait 3-6 hours (or overnight) to allow the powder to soak up the oil. Gently brush the powder off with a soft cloth. Repeat if necessary. |
| Ink Marks | Action: Blot the stain with a cotton swab dipped in rubbing alcohol (or non-acetone nail polish remover) until the mark is gone. Use tiny, careful motions. Immediately follow up by cleaning the spot with the soapy water solution and conditioning. |
| Dark Stains (on light leather) | Action: Mix a paste using equal parts cream of tartar and lemon juice. Gently rub the paste onto the stain, let it sit for about 10 minutes, then wipe it clean with a damp cloth. |
| Water Marks | Action: Moisten the entire affected panel lightly with a cloth dipped in distilled water and let it dry naturally. This helps the water spot blend back into the rest of the finish. |
4. Final Essential Step: Conditioning the Leather
Conditioning is what keeps your leather furniture soft, prevents it from cracking, and restores its protective layer. Do this after every deep clean.
-
Select Your Product: Use a commercial leather conditioner specifically formulated for furniture, or use a natural blend (such as one part white vinegar to two parts linseed oil).
-
Apply and Massage: Put a small amount of conditioner onto a clean, soft cloth. Work it into the entire surface of the leather in a gentle, circular motion. You should aim for a thin, even coat.
-
Allow to Absorb: Let the conditioner sit for the time specified on the product label (usually a few minutes) to allow the oils to penetrate the leather fibers.
-
Buff: Use a fresh, clean, dry cloth to lightly buff the leather, removing any excess residue and bringing the surface to a gentle shine.
5. What NOT to Use When Cleaning Your Leather Furniture (Crucial Guardrails)
Using the wrong product can permanently damage the finish and accelerate the aging of your furniture. Avoid:
-
❌ Abrasive or Harsh Chemicals: Bleach, ammonia, all-purpose household cleaners, and detergent wipes.
-
❌ Excessive Water: Never soak the leather.
-
❌ Waxes/Silicone Products: These can clog the pores and lead to a sticky residue or uneven sheen.
-
❌ Steamer: The high heat can flash out the leather's natural oils, causing it to dry out and crack prematurely.
With a simple, consistent routine, your leather furniture will remain a source of comfort and elegance in your home for years to come.
Frequently Asked Questions (FAQ)
Q1: How often should I clean and condition my leather furniture?
A: This depends on usage:
-
Routine Dusting/Wiping: Weekly is ideal, especially in high-traffic areas or homes with pets.
-
Deep Cleaning & Conditioning: Generally recommended twice per year (every 6 months). If the leather is in a very sunny spot or sees heavy daily use, you might consider conditioning every 3–4 months.
Q2: Can I use baby wipes or household disinfecting wipes to clean my leather?
A: No, you should avoid them. Most baby wipes and disinfecting wipes contain alcohols, oils, and chemicals that can strip the natural moisture and protective finish from the leather. Over time, this will lead to dryness, cracking, and a sticky residue. Stick to the mild soap and distilled water solution or a professional leather cleaner.
Q3: My leather smells a little musty. How can I remove the odor?
A: Odors often get trapped in the leather's surface or seep into the cushion stuffing.
-
Surface Deodorizing: Lightly sprinkle the entire surface with baking soda. Allow it to sit for several hours (or overnight) to absorb odors. Vacuum the baking soda completely.
-
Air Circulation: Ensure the room is well-ventilated, especially if the piece is new or stored in a humid area.
-
Deep Cleaning: A thorough deep clean and conditioning (as outlined above) can often neutralize surface odors.
Q4: What's the difference between cleaning and conditioning? Do I need to do both?
A: Yes, you need both:
-
Cleaning removes surface dirt, grime, and body oils. Think of this as washing your hands.
-
Conditioning replenishes the natural oils and moisture in the leather, keeping it supple, preventing it from drying out, and restoring its protective barrier. Think of this as applying lotion.
Cleaning without conditioning leaves the leather vulnerable to cracking, while conditioning dirty leather seals the grime in.
Q5: Why did my cleaning cloth turn the color of my leather? Did I ruin it?
A: If you see a small amount of color transfer, don't panic!
-
Protected/Finished Leather: If the leather is protected, a very small amount of dye transfer can occur when you remove surface grime. This is usually fine.
-
Aniline/Unfinished Leather: If you see significant color coming off, you may have an aniline (or unprotected) leather. These types should not be cleaned with water or soap. Stop immediately and call a professional leather cleaning specialist.
Q6: I have a small scratch on my leather. Can I fix it while cleaning?
A: For light surface scratches:
-
Rubbing: Use your fingertip to rub the scratch gently. The heat and friction can often redistribute the oils and wax in the leather's finish, making the scratch disappear or fade.
-
Conditioner: Once the area is clean, work a small amount of leather conditioner into the scratch to help swell the fibers back together.
For deep gouges, you will need a specialized leather repair kit or professional intervention.
Leather sofas come with major drawbacks: conditional comfort and high maintenance risk. See if fabric is a smarter investment. [Compare Leather vs Fabric Sofas.]